Release Notes 8.5.0
New Web App - Patient Statement Settings
1.
To access the statement settings of an account,
the admin user must ensure the “Statement Settings” checkbox is enabled under
the current web app -> Admin settings. 2.
Turning on the “Statement Settings” will make
the “Statements” option visible under the Settings tab.
1. Selecting Settings --> Statements, will open the settings in a new browser tab with new user interface.
2. The account chosen in the current web app will be auto synced to the new web app when the user opens the statement settings screen.
1.
Generate Statements: Enabling “Generate
Statements” will start generating statements for all applicable patients of the
account. If the “Generate Statements” option is disabled, the statements will
not be generated to any patient within the account.
2.
Balance Type:
a)
"Patient balances": the
application will fetch all the statements with patient outstanding
balances.
b)
"All balances": Not
configurable at the moment.
3.
No of Statements: application will
generate the number of statements for the patient based on the value provided
in this field.
4.
Generate First Statement (in days): application
will generate the first statement (from the time the invoice is generated) for
the patients based on the value provided in this field.
5.
Days between patient statements (in days): application
will generate the consecutive statements based on the value given in this
field.
6.
Print Vendor: application will
direct all statements generated for the account to the print vendor chosen in
this field by moving the statement to its respective print vendor's SFTP
location.
7.
Billing inquiries phone number: allows
the System admin/ account manager to provide the contact information for
billing inquiries.
8.
Mandatory details:
a) All fields under General Settings will act as mandatory fields when “Generate Statements” option is enabled.
b) Users will not be allowed to save any changes until all mandatory fields are filled in. Prompts the user to fill in the details.
c) When “Generate Statements” option is disabled, the user will be allowed to enter the details, however, they are not mandatory.
1. Daily: application will generate the statement every day at the default time (will use the default time that is already set in the current application)
2. Weekly: application will generate statements weekly based on the days of the week selected in this field.
3.3 Optional Settings
1. Show Tax ID: Includes the tax id in the statement when enabled.
2. Show Paid Lines: Includes the previously paid details in the statement when enabled.
3. Credit Card Payment: include this detail in the statement that the patient is eligible for credit card payment along with the credit card type.
4. Hold Statements for Credit Balance: enabling this setting will ensure the statements are on hold for patients having credit balances.
5. Billing Inquiry Number: provides the ability to set a billing inquiries number for the account.
6. Copy Settings From: allows user to copy and load the settings from another account. The user will be prompted with a confirmation popup. Upon confirming, the settings will be copied and saved against the account.
7. Custom Message Settings: allows the user to provide custom messages for a specific period. Any statement generated within the specified duration will include the custom message in the statement.
a) Add: allows the user to add a new custom message for a specific duration.
b) Delete: allows the user to select a row and delete the custom message row.
c) Update: allows the user to update any changes made to the Date From, Date To, and Custom Message fields.
d) Cancel: allows the user to cancel any unsaved data within the table.
4.1
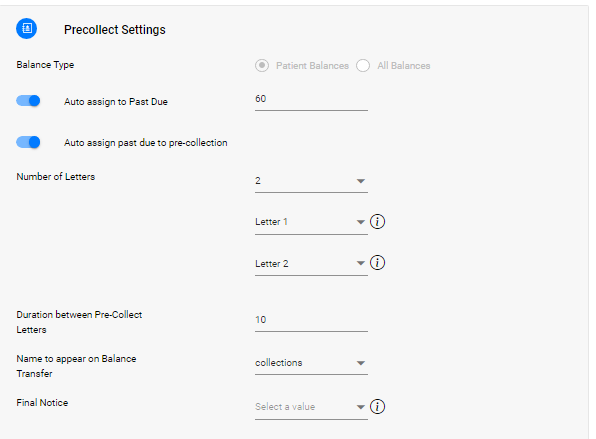
Pre-collect Settings  1.
Balance Type: show 2 option
buttons.
a) "Patient balances": the application will fetch all the statements with patient outstanding balances.
b) "All balances": This option will be editable after the rewrite of the insurance module.
2. Auto assign accounts to Past Due (in days): Depending on the option chosen in the Balance Type, the application will auto assign Past Due status for all Patient balance/ All balance accounts.
3. Auto assign Past Due to Pre-Collection: Enabling this option will auto assign the accounts from "Past Due" to "Pre-collect" status and below options will be made editable. When disabled, the below options will remain non-editable/grayed out.
4. No of letters: The application will trigger the letters based on the number and the type of letters chosen in this field.
5. Duration between pre-collect letters (in days): This field is applicable only when the "Number of Letters" value is more than 1. The application will generate consecutive letters based on the value provided in this field. i.e., the letters will be generated once in "X" days.
6. Name to appear on balance transfers: The application will display the name given in this field in the generated pre-collect letter.
7. Final Notice: The application will generate the final notice based on the type of final notice chosen in this drop-down. The final notice will be generated once all the pre-collect letters are generated/triggered.
8. Mandatory Fields:
a) When the Auto-assign Past Due to Pre-Collection option is enabled, the below fields become mandatory. When disabled, the user will not be allowed to save the settings.
i. No of letters (includes all 4 drop downs)
ii. Duration between pre-collect letters (in days)
iii. Name to appear
on balance transfers
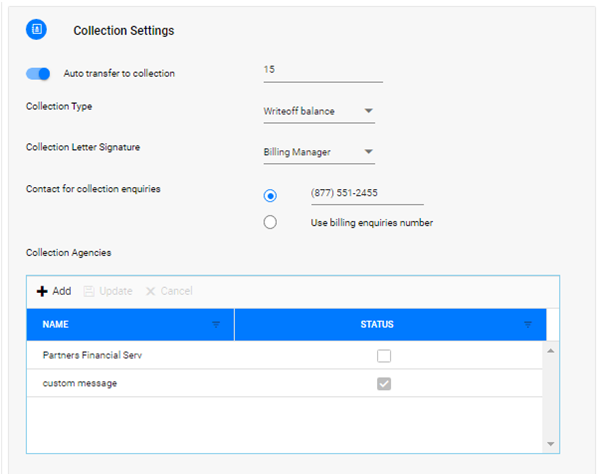
4.2 Collection Settings  1.
Auto transfer to collections (in
days):
a) If this setting is turned ON, the application will auto-assign all the balance accounts to "Collections" status after the Grace period set in this field.
b) Collection Type: The application will transfer the accounts to the collection type that has been chosen in this field.
c) Collection Letter Signature: The application will display the signature value set in this field in the collection letters.
d) For Collection Inquires:
i. Allow the user to enter the contact number for collection inquiries.
ii. Allow the user to choose the billing inquiries number as the collection inquiries number given in the statement settings screen.
e) Collection Agencies:
i. Add: allow the user to add a new collection agency by providing the Name and marking it as Active or Inactive status.
ii. Edit: allow the user to bulk edit by performing a double click to select a specific row item and edit the collection agency and its details from the grid.
iii. Update: allow the user to update the collection agency details. Please note, the grid will contain unsaved data in order to click the Update option
iv. Cancel: allow the user to discard any unsaved changes made to the grid by clicking the cancel button. By default, the Cancel option will be grayed out and becomes clickable when there are unsaved changes in the grid. Once canceled, the data will either revert to its original value if altered or the data will be removed if added as a new entry.
v. Table column & data:
1. NAME: show the collection agency name entered by the user.
2. STATUS: show the status of the collection agency as a check box. (Either Inactive (checkbox unticked) or Active (checkbox ticked)).
vi. Mandatory Fields:
1. When the option Auto transfer to collections (in days) is enabled, the below options will act as mandatory fields.
2. The user will be indicated with the text "Required" against the mandatory field when the data is not provided, and when the cursor focus moves to the next field.
a) Grace Period
b) Collection Type
c) Collection Letter Signature
d) For Collection Inquiries
e) Collection Agencies (grid) - must contain at least 1 collection agency listed in Active state. Validate while clicking on the Update grid option.
5 Dunning
Message Settings
5.1 General Settings
1. Apply To: Ensure the dunning messages that are applied/included as per the option selected in this field.
2. Statement Type: Ensure the dunning message is included in the type of statement that is selected.
3. Dunning message Grid:
a) Grid options: Update and Cancel options will be clickable only when there are unsaved changes in the grid. Otherwise, the options will be grayed out.
b) Allow user to double click on the field under "Dunning Message" column to add/edit the dunning message text.
c) The grid will list all four values (age of account), but the user will have to configure the dunning message against the relevant "age of account".
4. Dunning Message text validation:
a) The application will validate the text entered under the Dunning message column.
b) The character limit will be set to max 700 characters.
c) When user enters/copy-pastes beyond 700 characters, the application will prompt a speech bubble with a message “Exceeds 700 characters”.
5.2 Optional Settings
1. Copy Settings From
a) Enabling/turning on the "Copy Settings From", will allow the user to select an account from the drop down. When disabled/turned off, the drop down and Copy button will appear read only/grayed out.
b) Selecting an account from the "Copy Settings From" drop down will enable the Copy button.
d)
Clicking on Cancel button on the
confirmation popup,
i. will discard the copy action.
ii. close the popup.
iii. revert the selection of the account name in the drop down to the default text "Select an account".
iv. Turns off the "Copy Settings From" switch.
e) Clicking on Copy from the confirmation popup
i. Save the settings & close the popup.
ii. reload the grid to show the copied grid data.
iii. retain the Update and Cancel grip options grayed out.
iv. will show a success message (toast message) on the top right corner after copying the setting from the account chosen in the drop down.
v. Reverts "Copy Settings from" drop down with default text "Select an account".
vi. Turns off the "Copy Statement From" switch.
f) Please note: The settings screen will reflect the settings copied from another account upon successful copy action with/without automatic refresh of the screen.
Related Articles
ProviderSuite WebApp 8.3 Release Notes
ProviderSuite 8.3 Release Notes Table of contents ProviderSuite Web App 8.3 PBI 1798: Redesigned Login Page PBI 1781: Added “Patients” tab PBI 118: Added print feature for Scanned Ins Cards and Driver’s Licenses PBI 2508: Added Ins Plan ID to ...ProviderSuite 8.2 Release Notes
ProviderSuite 8.2 Release Notes Table of contents Customer Release Notes ProviderSuite Web App, Version 8.2 Contents PBI 2296: Settings > Insurance tab now accessible to Account Managers PBI 2145: Updated Patient Payments screen to accept patients ...ProviderSuite 7.2 Release Notes
ProviderSuite 7.2 Release Notes are attached to this article. Manage Patient Payments Easier The Patient Payments functionality of the Billing Manager applet (Billing Manager> Accounting> Patient Payments) has been added to the Web App. This new ...ProviderSuite 8.1 Release Notes
ProviderSuite 8.1 Release Notes Table of contents Customer Release Notes ProviderSuite Web App Version 8.1 Contents ProviderSuite Web App PBI 1610: Updated Billing tab UI and renamed to Claims tab PBI 1572: Renamed Scheduling to Appointments PBI ...ProviderSuite WebApp 7.5 Release Notes
ProviderSuite 7.5 Release Notes are attached to this article.